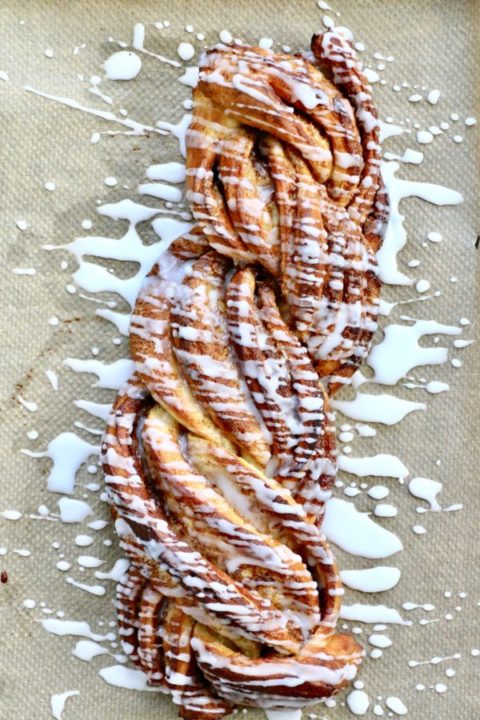
 Breakfast for us kids on Christmas morning was always cinnamon rolls: the soft, billowy kind with a simple filling of brown sugar and cinnamon and a sugary glaze, sometimes flavoured with orange, sometimes ‘regular’. We would eat from the outside, unwinding the layers bit by bit until the gloriously soft, sweet centre was left, saving the best for last.
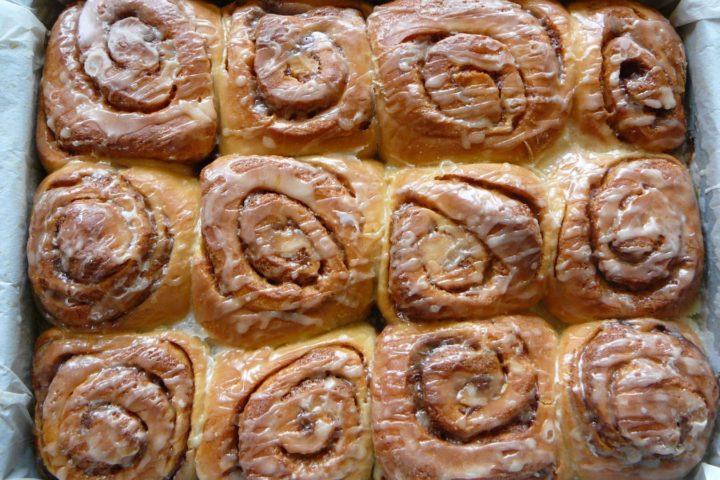 Sometimes they were made from scratch, and sometimes they were the novelty kind from the supermarket, packaged in a cardboard tube designed to be smacked on the edge of the counter to open (what fun!), and then peeled one by one onto the baking tray. I still recall the smell: yeast, cinnamon and something chemical. For us youngsters it seemed the height of luxury to have this hi-tech alternative to homemade (and wiser Mom didn’t mind as she was a tad busy with everything else). We smile at those canned cinnamon rolls now in the same way we do at pop tarts and old hairstyles, with nostalgic respect for our former selves, but relief we’ve moved on.
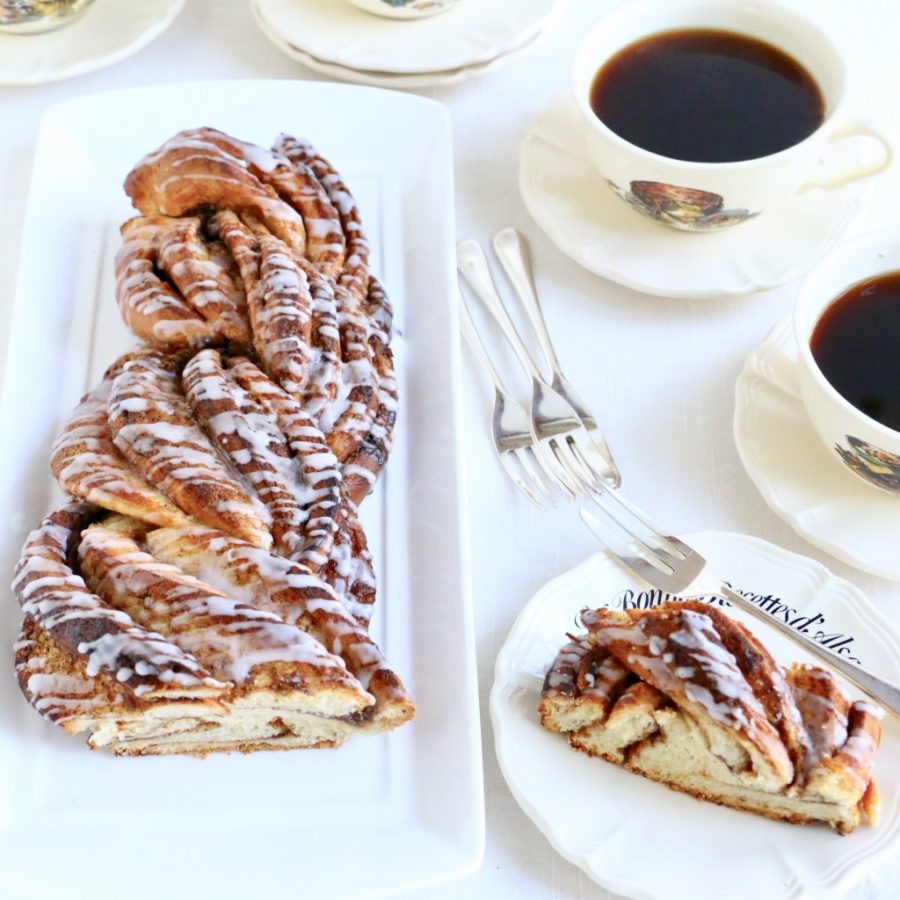 The real thing is incomparable, and there is something about the purely wholesome smell of them baking that builds anticipation like nothing else. When they finally emerge to be glazed, pulled apart and tasted, warm, fragrant, lickable, the pleasure-centre gets a rush of reward straight in the bulls-eye. They appeal unashamedly to that primal love of freshly baked bread, and our human craving for sweetness and spice. Who can possibly resist?
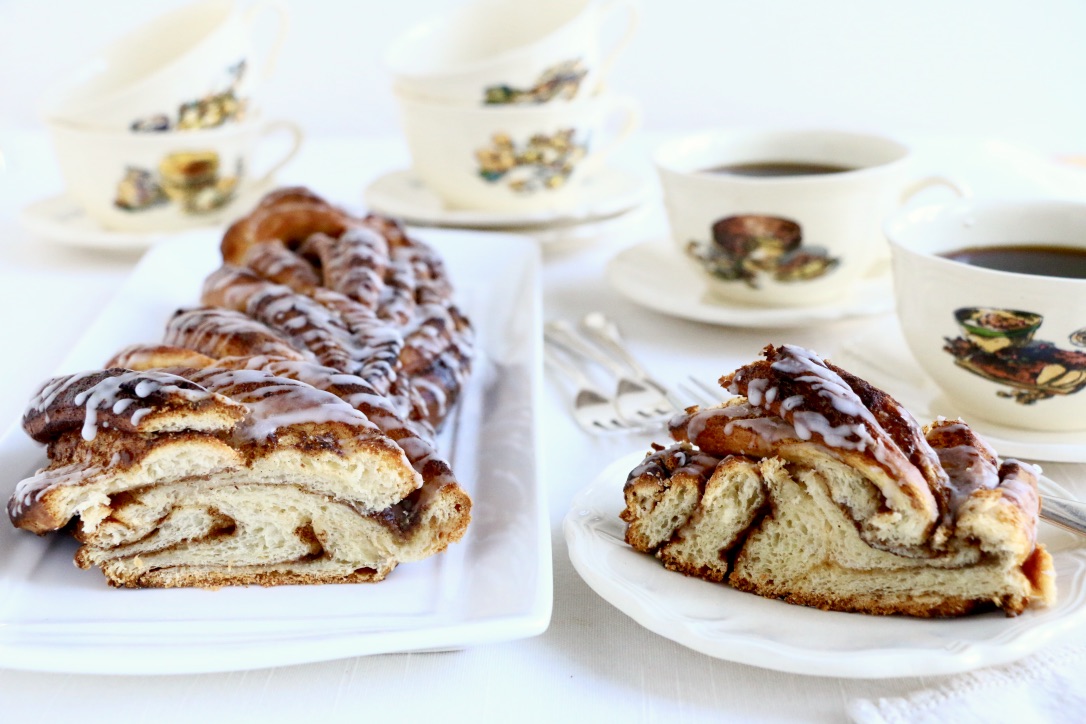
This simple recipe is my favourite of them all. I always follow it when making classic cinnamon rolls, and I also love to use it for making impressive centrepiece cinnamon twists and wreaths. The enriched dough is tender and rich with vanilla, milk and honey, butter and eggs. The filling is simple and delightful: softened butter, Muscovado (or light brown) sugar and ground cinnamon, as fresh and fragrant as you can get.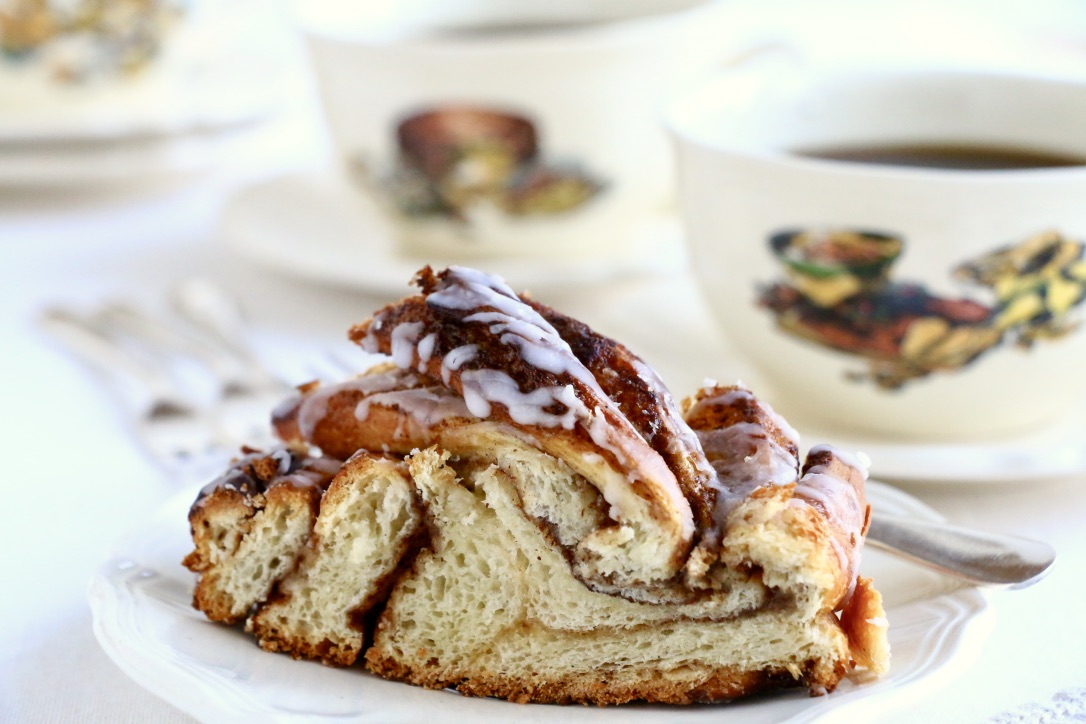 I show you how to make four different types of cinnamon pastry with this same dough and filling, and even the fanciest are easy to achieve. This recipe makes one large pan of a dozen deep, generous cinnamon rolls, or two elegant cinnamon wreaths or twists that feed about six people each (one for a gift, and one for you). They are all fun to shape, and start with the same easy rolling process. And it doesn’t matter if the results aren’t perfectly symmetrical because they will be homemade, soft, sweet, fragrant, and so much better than anything you can buy.
 The entire process is easy, but you do need to allow time for the dough to rise. From start to finish you’ll need 5-6 hours before you can serve your creations, but the mixing itself is easy and kneading is a cinch with a standing mixer and a dough hook. You will need a patient 15 minutes or so to knead by hand if you don’t have a machine, but it can be pleasant, therapeutic work that imposes a few minutes of calm in a frenetic day, especially as it’s such a lovely dough to handle.
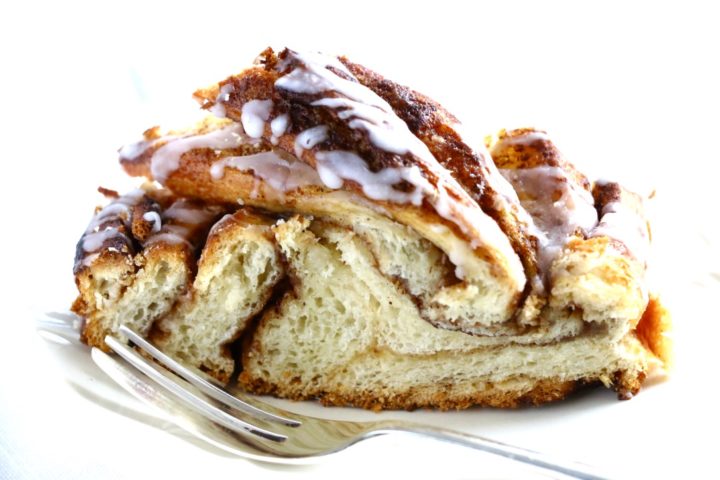 The dough needs two rises: the first after mixing and kneading, and the second after shaping before it can be baked. All rising times depend on your yeast and the temperature of your kitchen, but if it does take longer than you expect, console yourself with knowing that a slow rise makes for superior flavour.
To make these pastries ahead:
All of these lovely cinnamon treats are at their very best warm from the oven, but they are nearly as good at room temperature when freshly baked, so you can bake them a little ahead on the day you want to serve them. As freshness is key, it can be a challenge to work out how to plan ahead, but there are several options that make these very do-able when time is limited:
- The finished products freeze beautifully if wrapped well and can easily be warmed through if you wish (the glaze will melt further on re-heating, but this doesn’t affect the taste). Defrost still wrapped so condensation stays on the outside. Refresh individual portions in the microwave for about 10 seconds each, or wrap the whole (thawed) pastry in foil and warm through in a low oven.
- The dough itself can also be left to rise overnight in the fridge for the final shaping next morning – something I find useful as I typically serve these freshly baked for brunch. This has another bonus as the dough is very easy to shape after its rest in the fridge and keeps its shape better for neater results. As the dough will be cold, you will need to allow a couple of hours at room temperature, maybe a little longer, for the final rise after shaping.
- You can also roll, fill and shape the pastries the night before and let them rise overnight in the fridge ready to be baked next morning (though sometimes you get a bit of seepage from the filling with this method). You will need to check that they have risen enough and if they haven’t, give them a couple of hours at room temperature to take the chill off and re-activate the yeast.
- It is also possible to freeze the pastries once risen. You can bake smaller ones straight from frozen, adding a few extra minutes to the baking time. However, for pans of cinnamon rolls and large pastries, it’s much better to thaw them first, as you can be left with undercooked centres if you bake them straight from frozen.
 MASTER RECIPE
Cinnamon rolls, wreaths and twists
The dough recipe is adapted from one for cloverleaf dinner rolls in the March/April 1997 edition of Cuisine magazine.
Makes one pan of 12 large cinnamon rolls, or two cinnamon twists or wreath pastries, each serving 6.
Follow the master recipe below through step 10 for all shapes, and see the separate directions with photographic illustrations for shaping and baking whatever variation/s you wish to make. Return to step 12 for instructions on glazing the pastries once baked.
Ingredients
For the enriched sweet dough:
- 60ml (about ¼ cup) warm water: just blood-heat, no hotter
- 24g (¾ oz) fresh yeast, or 12g (1 tablespoon or ½ oz) dry-active yeast
- 1 teaspoon sugar
- 125ml (½ cup) milk warmed just to blood-heat
- 115g unsalted butter (½ cup, 4 ounces, or 1 stick)
- 40g light honey (2 level tablespoons)
- 2 large eggs
- 2 teaspoons vanilla bean paste or real vanilla extract
- 520g (4 cups sifted) all-purpose flour; plus about 20g more (2 tablespoons, unsifted) in reserve to use if needed
- 1 level teaspoon cooking salt
For the filling:
- 90g (6 tablespoons) very soft, spreadable unsalted butter; use half for each pastry if making two wreaths or twists
- 200g (1 cup packed) light brown Muscovado sugar (or light brown sugar); use 100g (½ cup packed) per pastry if making two wreaths or twists
- 4 teaspoons ground cinnamon, as fresh and fragrant as possible; half for each pastry if making two wreaths or twists
For the glaze:
- 170g (1 1/3 cups sifted) icing/confectioners’ sugar
- 3 tablespoons water or orange juice
- Optional: 1 teaspoon finely grated orange rind, or 3-4 drops real orange extract
Directions
- Put the warm water and sugar into the bowl of a standing mixer fitted with a dough hook – or into a large mixing bowl if you intend to proceed by hand. Make sure the water is not too hot or you will kill the yeast; it should feel just warm, as you would heat a baby’s bottle. Crumble the fresh yeast, if using, into the warm water, or sprinkle on the dry-active yeast and leave the yeast to activate while you tend to the other ingredients. The sugar helps to wake it up. You should notice a bit of foaming, which tells you the yeast is alive and working.
- In a measuring jug, heat the milk with the honey and butter in the microwave on medium setting for about 1 minute until the butter begins to melt and the honey starts to dissolve. Stir halfway through to encourage this process, and heat again for a few seconds if needed, but don’t let the milk boil or get any hotter than needs be, as you will need to cool the liquids to lukewarm again before proceeding. (You can of course do this in a small saucepan instead of the microwave.)
- When the milk, butter and honey are melted and back to lukewarm, add them to the activated yeast in the bowl. Give everything a stir and add the eggs and vanilla. Stir well again.
- With the mixer on lowest speed, gradually add the salt and the 520g (4 cups) of flour, leaving the other 20g (2 tablespoons) in reserve. Alternatively, beat the salt and flour in with a heavy spoon. Mix by machine (fitted with the dough hook) for 5-10 minutes on medium-high speed (or knead on a lightly buttered or floured work surface for about 15 minutes by hand) until the dough mostly comes away from the bowl. If it seems too wet, keep mixing and only add the remaining flour if it’s impossibly sticky. The dough will get less sticky as it gets smoother. You will know it’s been kneaded enough when it’s as smooth as a baby’s bottom; it will be strong and elastic, and if you poke it with your finger, it will spring back.
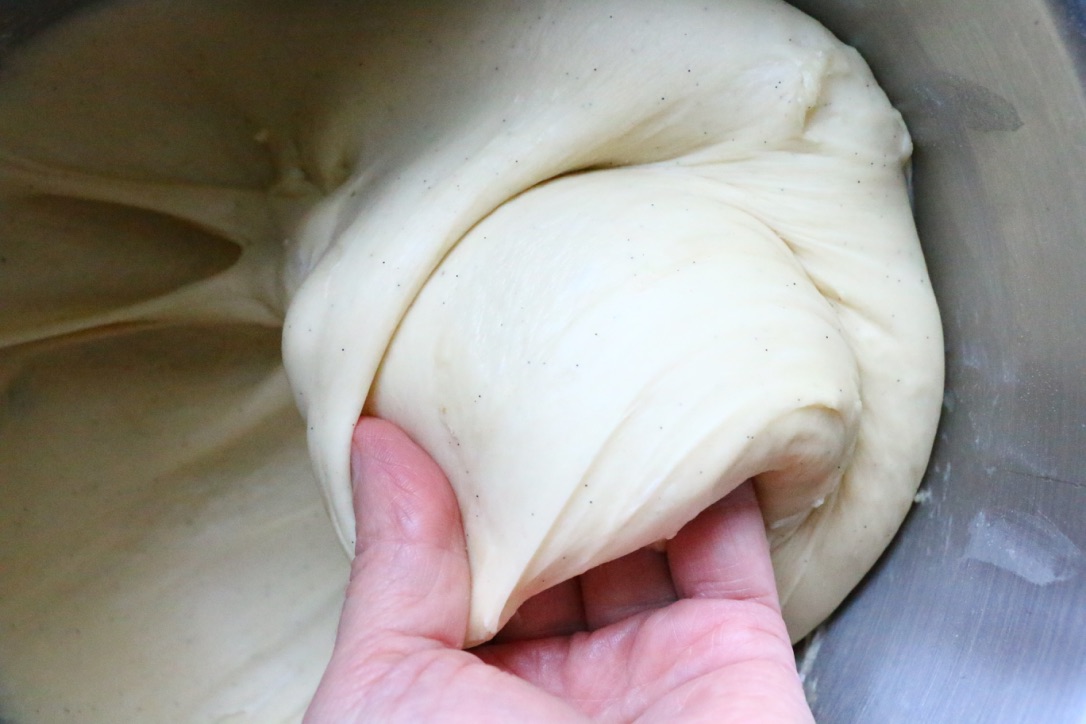 If you are kneading by hand, turn the dough out onto a clean work surface once it’s come together, and continue to knead until smooth and elastic as described above. I prefer to lightly butter my hands while kneading by hand rather than using flour, but do flour your surface and your hands if this works better for you. Just try to keep additional flour to the minimum, as more flour makes the dough heavier.
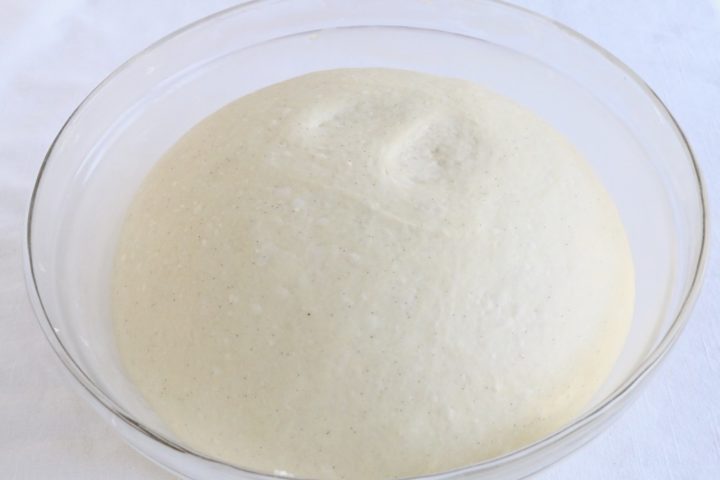
 - Once the dough is adequately kneaded, form it into a neat ball and place it in a large, clean, well-buttered bowl, turning it over so it’s buttered on top as well. Cover the bowl with cling film or a wet cloth, set it in a warmish place out of draughts, and leave for about 2 hours or until a bit more than doubled in bulk. A proper rise ensures a lovely light texture, but don’t leave it so long that it begins to collapse. You’ll know the dough has risen the right amount if you poke it lightly with your finger and it springs halfway back. If it springs all the way back it needs more time, and if it doesn’t spring back at all and looks like it’s wrinkling into itself, it is over-risen. If it does collapse, you can rescue it (providing you’re not using a single-rise fast-acting yeast): just punch it down, shape it back into a ball and leave it to rise again (it will go faster on this second rise).
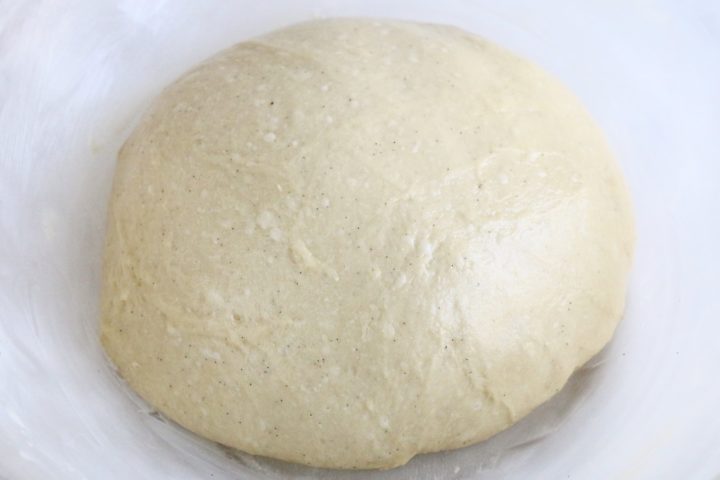 Above, the kneaded dough is tight and dense before it rises. Below, the dough has risen to more than twice its original size and is now airy and lighter in colour.
 TIP: You can let the dough rise slowly in the fridge overnight if you find it convenient. It will need longer for the second proof once shaped (as long as 2 hours) as it will need to come back to room temperature, but it is easy to roll and cut when cold.
6. Rolling the dough and adding the filling follows the same principles regardless of which shape you’re making, so these basic steps are illustrated here. However, the size of the rectangle required for the cinnamon rolls is larger than that required for the twists and wreaths, so please also consult the individual instructions for each shape.
Once the dough has risen, deflate it by ‘punching it down’ and gathering it into your hands to gently remove the air. Use all the dough if making the cinnamon rolls, and divide the dough into two equal parts if making the twists or wreaths, and work with one half at a time (cover the other half to prevent it from drying out).
7. It’s easier to roll out the dough and shape it on a pastry- or cutting-board if you can. Lightly flour your work surface and rolling pin, but use as little flour as you can, as excess flour makes the dough heavier. Working with lightly buttered or floured hands, shape a rough rectangle on the board, and then begin rolling it with the rolling pin gently in each direction, trying to keep as even a shape as possible, until you have the size and thickness required. Check to make sure the dough isn’t sticking to the work surface and add a little more flour if you need to. Swap back to using your hands to stretch it along if you find it helpful. If the dough is resisting staying in place, leave it to rest for 5 minutes or so and then go back to it. (If you work with chilled dough you won’t have any problems with the dough shrinking back.)
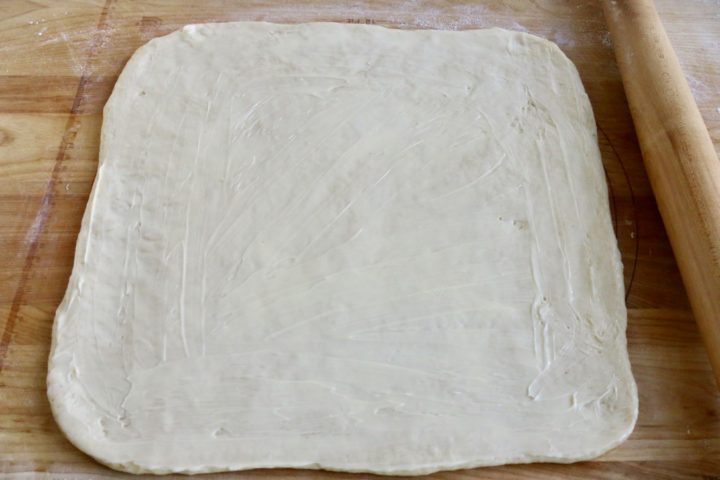 8. When the dough is the size and thickness you need, spread it with the soft butter all the way to the edges.
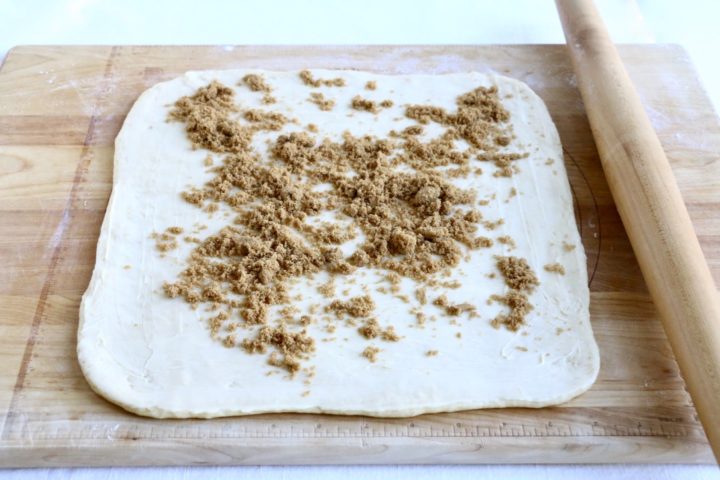 9. Sprinkle on the sugar and spread it evenly. Then sprinkle on the ground cinnamon as evenly as you can.
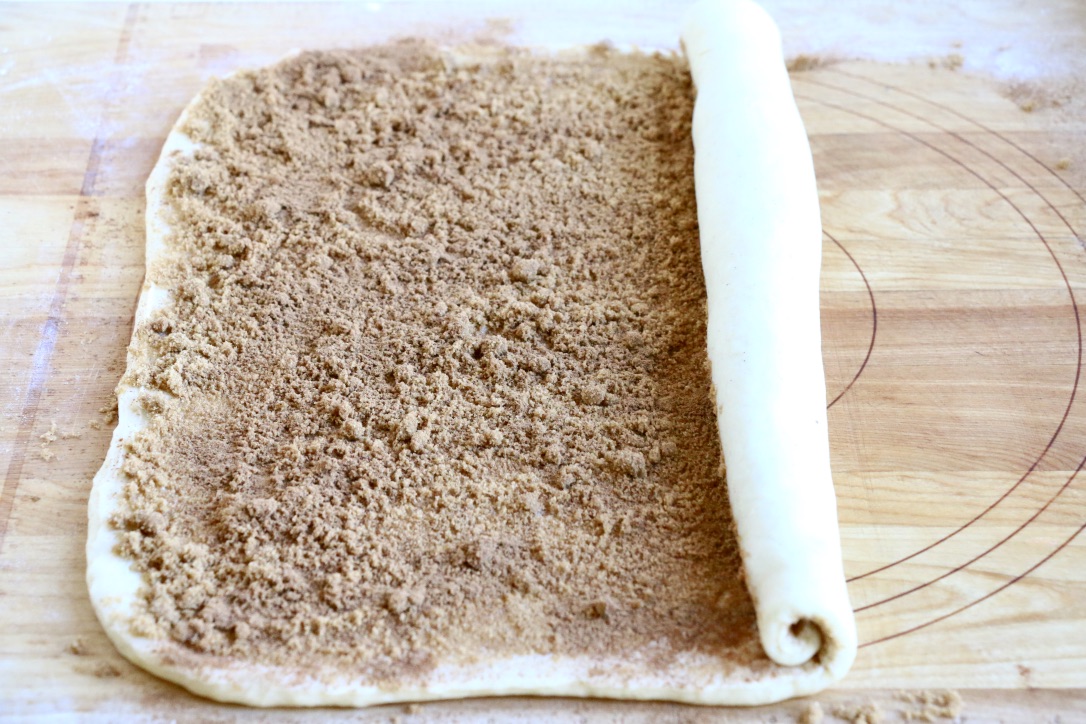 10. Start rolling from the longest side, as snuggly as you can until you have a neat dough ‘log’.
 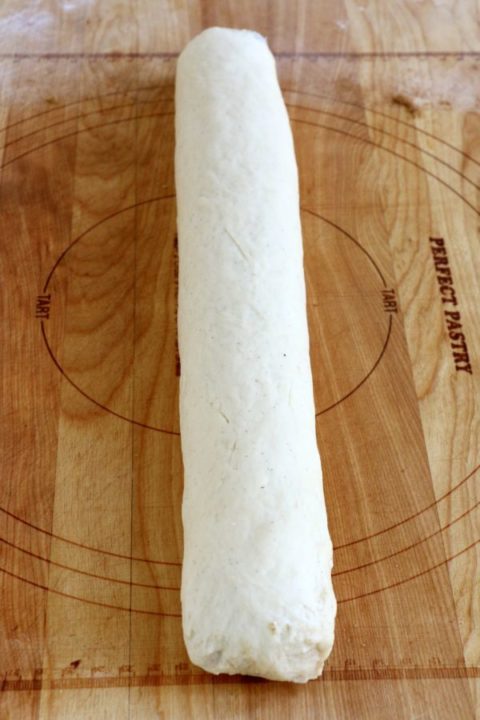 Cinnamon rolls, twists and wreaths all start with this basic shape. Note that it’s not necessary to tuck in the ends as shown here when making cinnamon rolls or wreaths: only do this for twists.
11. Skip to the directions given below for shaping, filling and baking the shape/s you’ve chosen to make. Return to direction number 12 for glazing the baked pastries.
12. To glaze the baked pastries: The glazing principle is the same for all shapes: while the pastries are baking, mix up all ingredients for the glaze in a small bowl and stir vigorously until completely smooth. When the pastries are out of the oven but still very warm, apply the glaze with either a pastry brush or a small spoon. Drizzle it on in thin lines, or simply cover every surface using the back of the spoon.
I never bother with an egg glaze for these pastries as the sugary glaze gives a lovely shiny finish. However, if you want to add this step, simply beat one medium egg with a tablespoon of milk or water and apply it gently to every surface of the shaped pastry before baking, using a pastry brush.
* * * * * *
(The master recipe makes one pan of 12 generous cinnamon rolls)
- Butter a 23 x 33 x 7cm (9 x 13 x 2¾ inch) baking pan or similar and line it with baking parchment. Lightly butter the parchment as well.
- Roll the dough (as described in step 7 of the master recipe) into a large rectangle about 1.25cm (½ inch) thick or slightly thinner. The exact dimensions of the rectangle aren’t critical , but it will be something like 38-40cm (15 to 16 inches) by 28-30cm (11 to 12 inches).
- Top the dough with the softened butter, sugar and cinnamon as illustrated in steps 8 through 10, above, using the full amounts called for in the master recipe.
- Starting with the longer side of the rectangle, roll the dough up as tightly and evenly as possible into a pinwheel ‘log’. Gently pinch the overlapping edges of the log along its length to seal it, and roll it over so the seam is underneath.
- Cut the log into 12 cinnamon rolls of even thickness. The easiest way to do this is to cut the log in half first, and then cut each half into two pieces so you have four quarter-logs. Cut each of these into three cinnamon rolls.
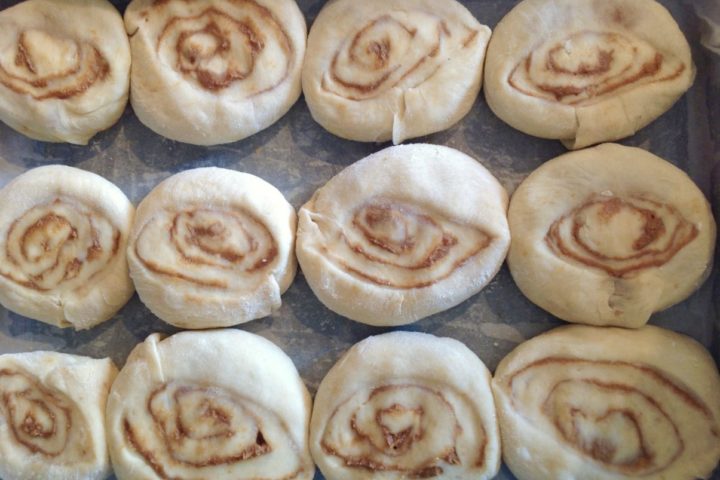
- Place the 12 rolls in the pan, spiral-side up. Gently press them into the pan to even up the heights, if necessary. Cover the pan with cling film or a damp cloth and leave the rolls to rise until they have almost doubled in size (about 1 hour, or two to three times this if you are using chilled dough). You can also refrigerate the rolls at this stage to rise slowly overnight if you wish. Check them in the morning to make sure they have risen sufficiently. If not, you’ll need to give them time at room temperature, possibly two hours depending on how much they’ve risen in the fridge.
- When you’re about ready to bake, heat the oven to 175C/350F.
- When the rolls have risen sufficiently, bake them for about 35-45 minutes until richly golden in colour, turning the pan about halfway through to promote even browning. Test for doneness: the top should feel firm but not hard or dry when touched, and a toothpick or cake-tester stuck into the centre of the rolls should come out easily without resistance. You can also lift the rolls out using the parchment paper as support and feel underneath to see if the centre feels firm. If it’s at all soft, give it another 5 minutes at a time and check again. Cover the pan with foil if you feel the rolls are browning too quickly.
- While the rolls are baking, mix the glaze as instructed under step 12 in the master recipe, above. As soon as the cinnamon rolls are done, put the pan on a cooling rack, and while still very warm, drizzle or spoon on the glaze.
- Serve them warm or room temperature. Either lift them out with the support of the parchment paper and pull them apart; or leave them in the pan and cut them to release.
- Should you wish to freeze them, lift the rolls out of the pan in one piece using the parchment paper as support. Let cool completely on the cooling rack and then wrap well with parchment and cling film or foil, label and freeze. Defrost while still wrapped so condensation stays outside.
* * * * * *
(The master recipe makes two twists (or wreaths). Work with half the dough at a time and follow the shaping and baking directions below for each pastry in turn.)
- Line a large baking tray with parchment paper or a silicone liner.
- Following the rolling instructions given in step 7 of the master recipe, roll half of the dough into a rectangle about 25x30cm (9×12 inches) and about 0.6cm (¼ inch) thick (thinner than for the cinnamon rolls). The exact dimensions of the rectangle isn’t critical, but aim for as uniform a thickness as possible, and go as thinly as you can without risk of tearing the dough.
- As described in steps 8-9 of the master recipe, spread 45g (3 tablespoons) of the soft butter over the surface of the rolled dough, going all the way to the edges. Spread 100g (½ cup) of brown sugar evenly over the butter, and sprinkle on 2 teaspoons of cinnamon.
- Starting with the longer side of the rectangle, roll the dough up as tightly and evenly as possible into a log (as shown in step 10). Gently pinch the overlapping edges of the log along its length to seal it, and roll it over so the seam is underneath. Tuck the two ends neatly under as well (as shown in picture of the finished log), and straighten the log to make cutting easier.
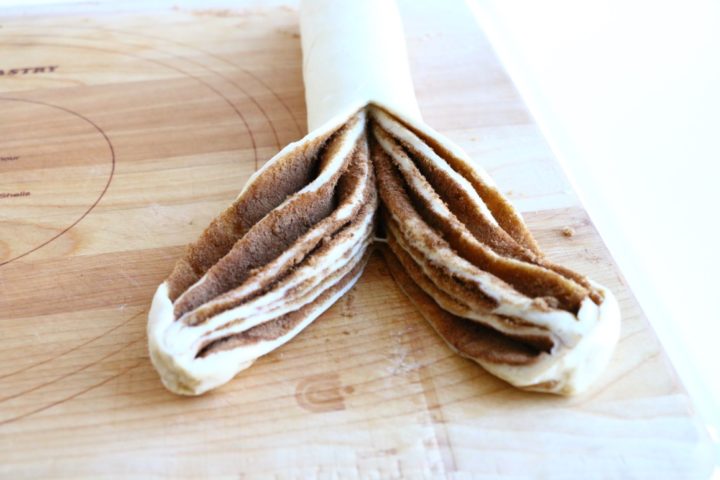
- Using a sharp knife, make a long incision lengthways through the middle of the log, starting from about halfway down its length, leaving the top half uncut. The idea is to work half the length of the roll at a time. You should end up with two ‘legs’ of dough with their layers exposed (as shown above).
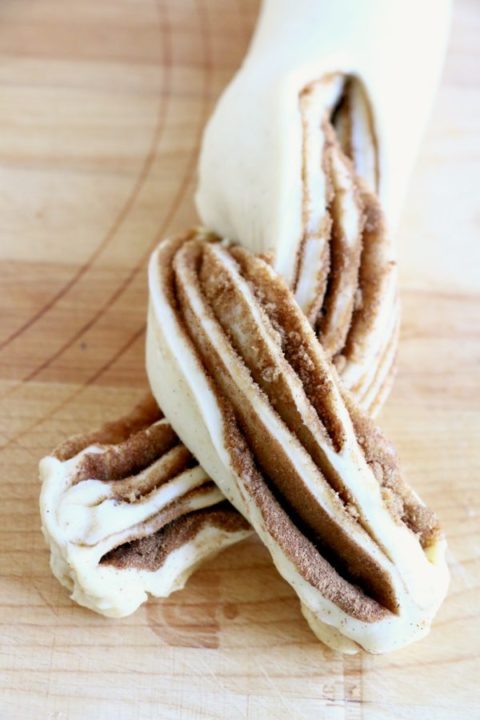
- Cross one dough ‘leg’ over the other, keeping the exposed layers on both legs as upright as possible for a decorative effect; keep the twists on the loose side to give the dough room to rise again once it’s shaped.
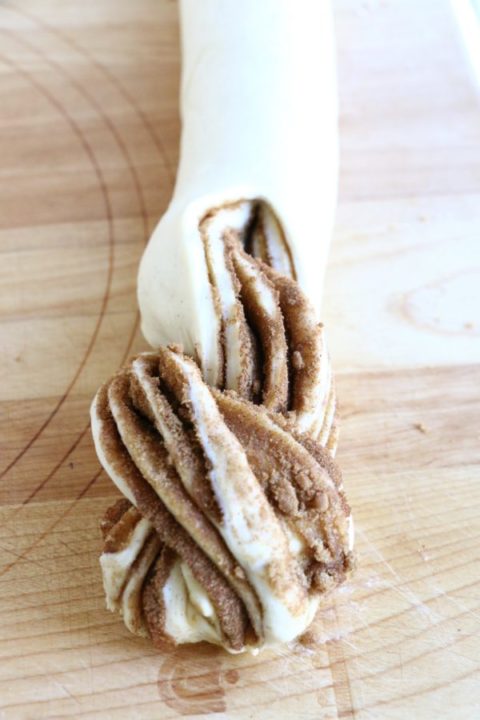 7. Continue crossing the legs of the dough over each other in an alternating pattern until you get close to the end of the log. Tuck the ends securely under for a neat finish.
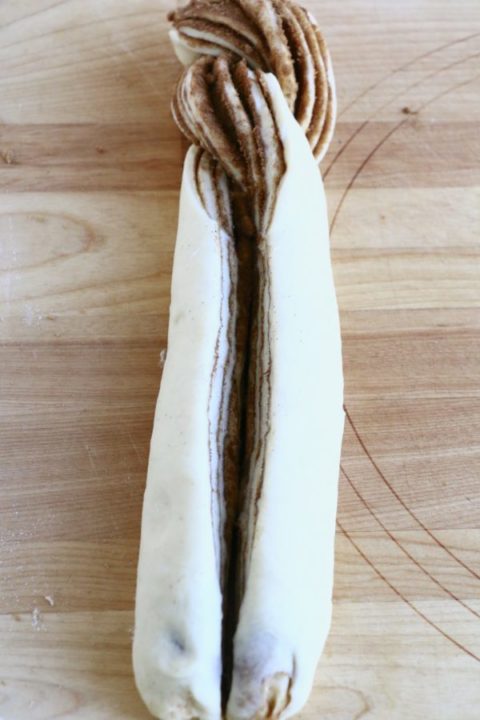 8. Turn the pastry/chopping board so the uncut part of the log is in front of you, and the section you’ve finished twisting is at the top. Starting from the previous incision at the top, slice down the remaining length of the log, straight through the middle to create two evenly sized ‘legs’ (see photo above).
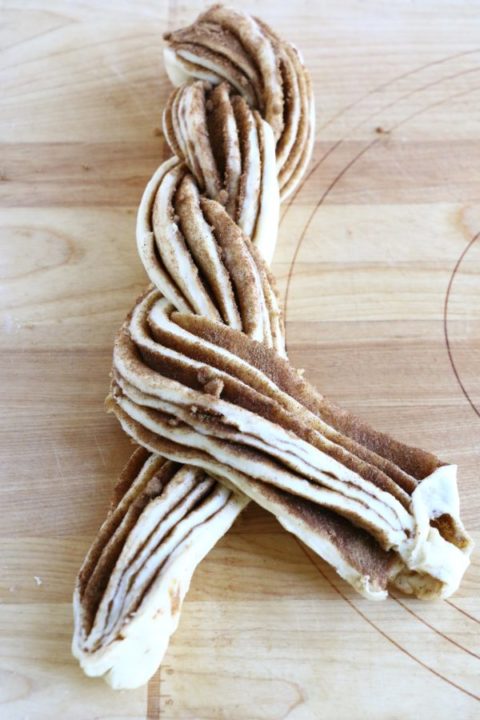 9. Start crossing the dough legs from here, in the same manner as you did to start, until you get to the end of the log. Neatly tuck in the bottoms again.
- Carefully transfer the twist onto a baking tray, straightening it and ensuring the ends stay tucked under. Cover loosely with clingfilm or a slightly damp cloth and place out of draughts to rise again until doubled in size, about 45-60 minutes (twice or three times that if the dough is cold from the fridge). You can refrigerate it overnight at this point to rise slowly if you wish; just allow time to check that it has risen enough next morning; and if not, bring it to room temperature to continue rising.
- When risen sufficiently, heat the oven to 175C/350F. When the oven is up to temperature, bake the twist for about 25-35 minutes, or until it’s an even golden-brown on top. Rotate the pan halfway through to promote even browning, and cover loosely with foil or parchment paper if it looks like it’s browning too quickly. Check for doneness: it should feel firm to the touch, but not hard or dry, and it should sound almost hollow when tapped. Gently lift and take a peek: it should be golden underneath.
- Glaze while still very warm, and serve right away or at room temperature. Cool on a rack to prevent sogginess. Leftovers can be refreshed in the microwave: heat each serving for about 10 seconds. If you wish to freeze the twist, cool completely and wrap well. Defrost still wrapped so the condensation stays outside.
* * * * * *
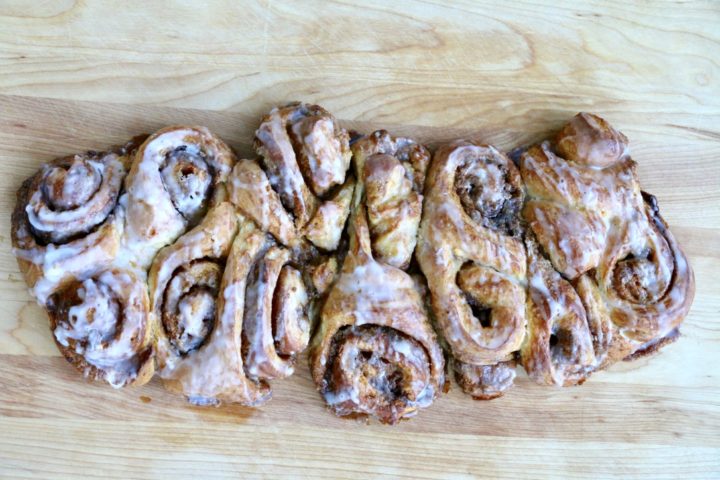 Cinnamon double-twist
This shape has more in common with the cutting technique for the wreath, but it’s baked in a long loaf rather than a ring.
The master recipe makes two of these; work with half the dough at a time. Instructions below are given for one pastry as it’s easier to make them in turn.
- Line a large baking tray with parchment paper or a silicone liner.
- Following the rolling instructions given in step 7 of the master recipe, roll half of the dough into a rectangle about 25x30cm (9×12 inches) and about 0.6cm (¼ inch) thick (thinner than for the cinnamon rolls). The exact dimensions of the rectangle isn’t critical, but aim for as uniform a thickness as possible, and go as thinly as you can without risk of tearing the dough.
- As described in steps 8-9 of the master recipe, spread 45g (3 tablespoons) of the soft butter over the surface of the rolled dough, going all the way to the edges. Spread 100g (½ cup) of brown sugar evenly over the butter, and sprinkle on 2 teaspoons of cinnamon.
- Starting with the longer side of the rectangle, roll the dough up as tightly and evenly as possible into a log (as shown in step 10). Gently pinch the overlapping edges of the log along its length to seal it, and roll it over so the seam is underneath. Tuck the two ends neatly under as well (as shown in picture of the finished log), and straighten the log to make cutting easier.
- Start to shape the pastry: Cutting all the way down to the board, slice the resulting dough log on alternating sides, at about 4cm (1.5 inch) intervals. Extend each cut about two-thirds of the way into the log, leaving one-third intact. You’ll end up with a kind of dough Slinky.
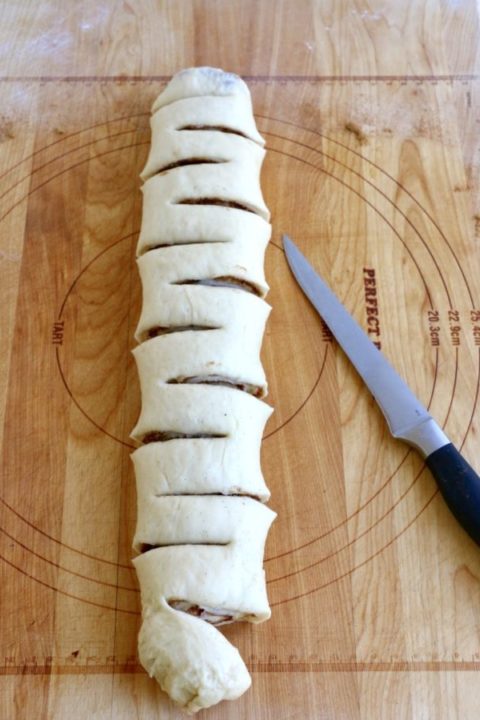 Carefully transfer the snipped log to a parchment-lined baking sheet (you may need to position it on the diagonal to give it room). Spread it out a little to allow room for manoeuvre, and then begin twisting each cut in opposite directions so the spiral cross-section is uppermost. Pat the shapes down as required to make them more level and fiddle a little to line the spirals up in pleasing fashion. My latest double-twist, below, looks like a space-alien grub at this stage, but it was still impressive when baked, so if yours isn’t perfect either, love the shape you get.
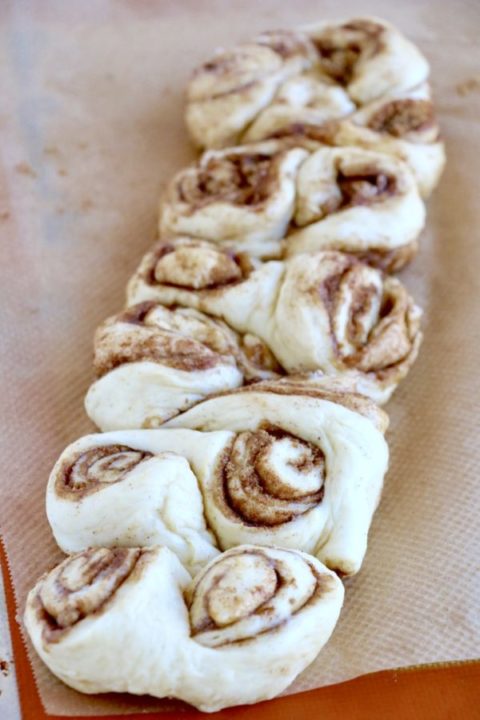
- When you’re about ready to bake, heat the oven to 175C/350F. This double twist requires about 30-35 minutes in the oven; rotate the baking sheet about halfway through for even browning.
- Check it for doneness, paying particular attention to the middle of the double twists where the dough is thickest, and lift it carefully to check that the bottom is golden. The top should be a golden brown and feel firm, but not hard or dry, to the touch. A toothpick or cake tester inserted into the thickest part of the pastry should come out without resistance. Loosely cover it with foil if it seems to be browning too quickly.
- Glaze while the pastry is still very warm, following instructions in step 12 of the master recipe, above.
* * * * * *
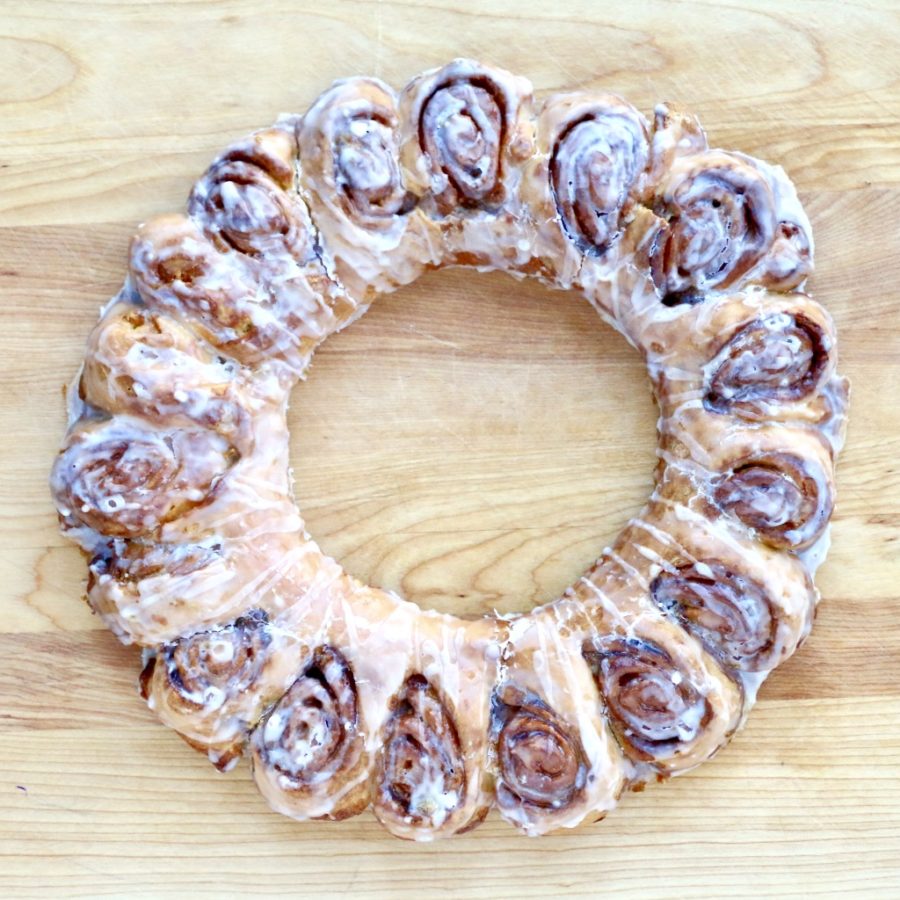
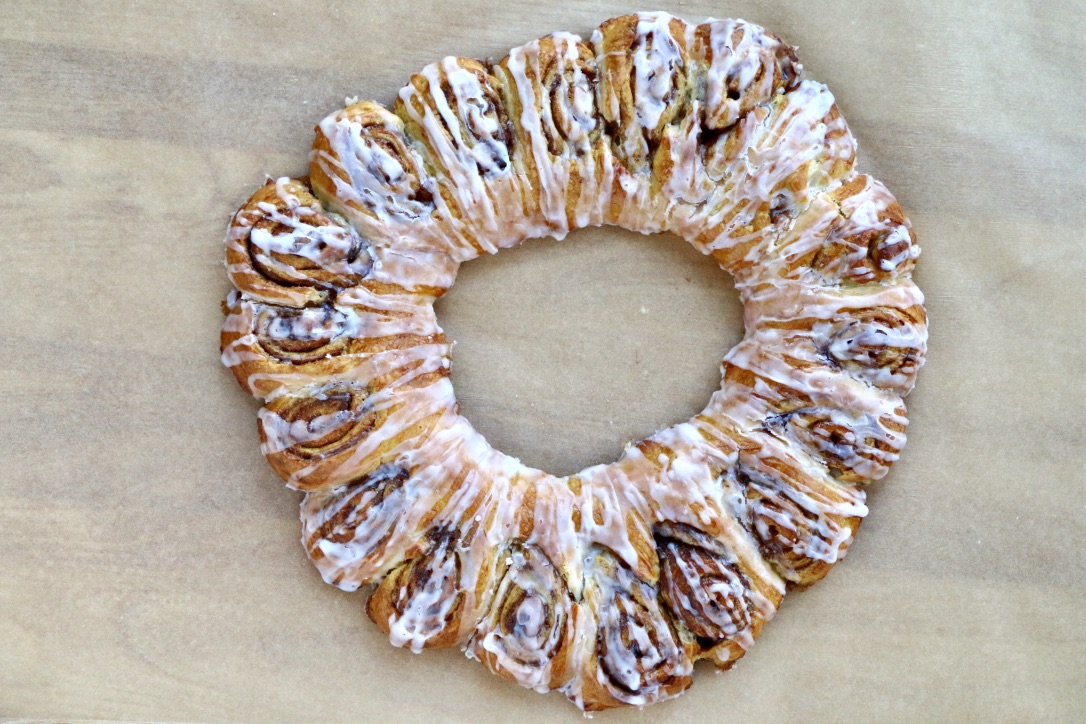
This shape makes a lovely Yuletide centrepiece for a special occasion. Like the twists, one wreath requires half the dough made from the master recipe (and half the filling), so you can make two of these; or for variety, make one wreath and one twist. Instructions below are for making one wreath at a time.
- Line a large baking tray with parchment paper or a silicone liner.
- Following the rolling instructions given in step 7 of the master recipe, roll half of the dough into a rectangle about 25x30cm (9×12 inches) and about 0.6cm (¼ inch) thick (thinner than for the cinnamon rolls). The exact dimensions of the rectangle isn’t critical, but aim for as uniform a thickness as possible, and go as thinly as you can without risk of tearing the dough.
- As described in steps 8-9 of the master recipe, spread 45g (3 tablespoons) of the soft butter over the surface of the rolled dough, going all the way to the edges. Spread 100g (½ cup) of brown sugar evenly over the butter, and sprinkle on 2 teaspoons of cinnamon.
- Starting with the longer side of the rectangle, roll the dough up as tightly and evenly as possible into a log (as shown in step 10). Gently pinch the overlapping edges of the log along its length to seal it, and roll it over so the seam is underneath.
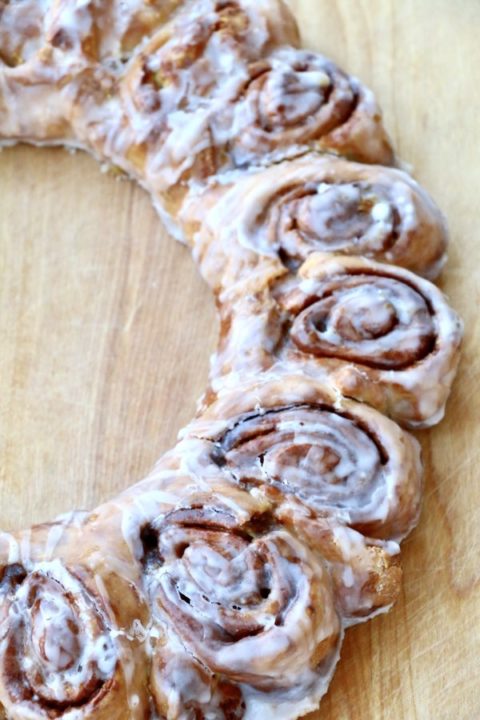
- To shape the cinnamon wreath: There is no need to tuck the ends of the log under as you would for the cinnamon twists. Instead, join the two ends together to form a ring, pinching them together as neatly as you can.
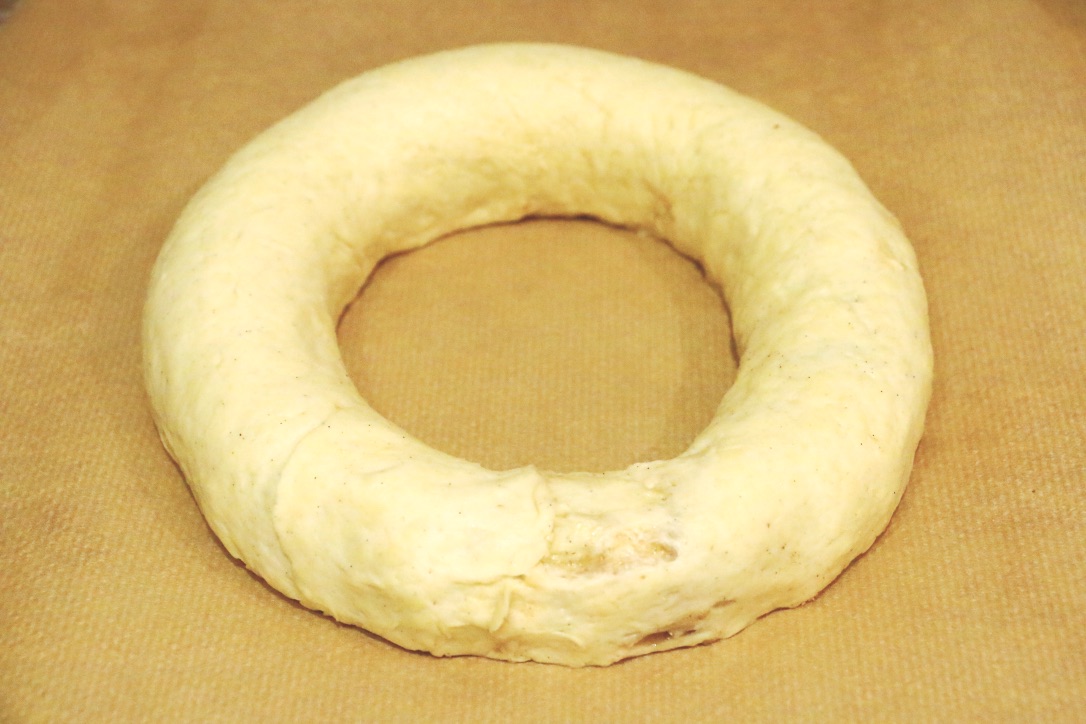
- Using a sharp knife, make regular incisions every 4 cm (1½ inches) along the outside of the ring, cutting into a little over two-thirds the depth of the log.
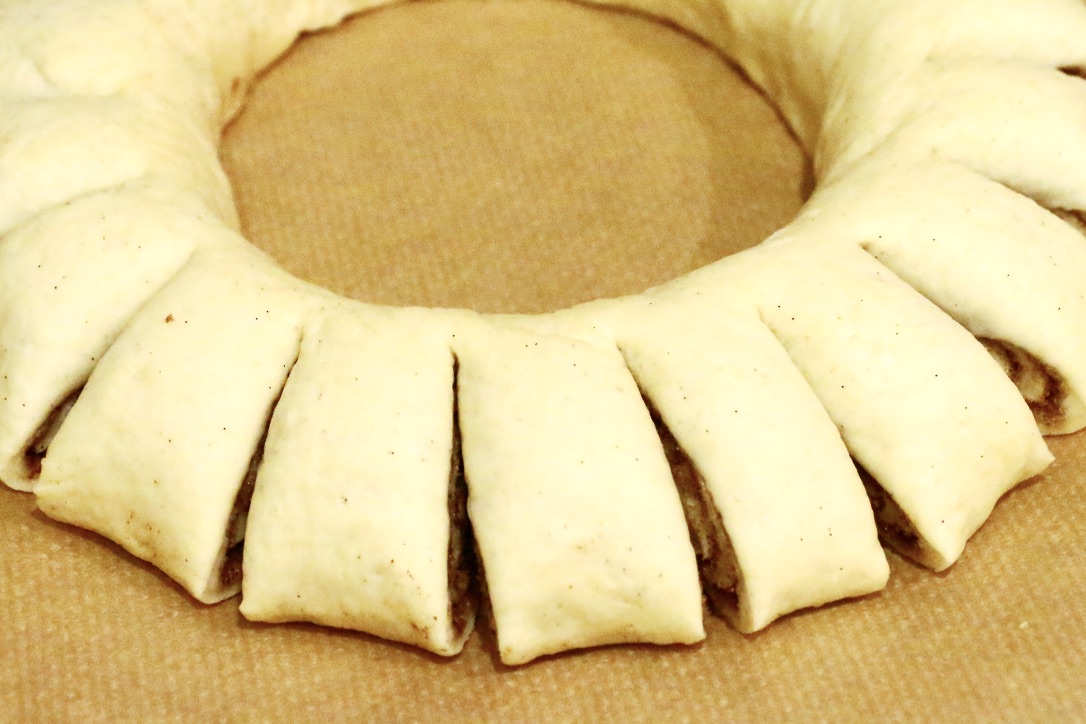
- Carefully transfer the wreath to the parchment-lined baking sheet and spread out the ring to make it easier to shape and to allow room for further expansion. Twist open each cut, always going in the same direction, so the spirals lie flat against the baking sheet, facing upwards. Tidy up to make the ring loosely symmetrical, but don’t fuss too much as the dough can overstretch. Working with chilled dough will give you a neater finish, but I usually shape it immediately after the first rise when it’s gently warm, and accept a few imperfections. The wreath will alter its shape in the oven in any case, as bread dough always does. It’s part of the charm of a homemade treat.
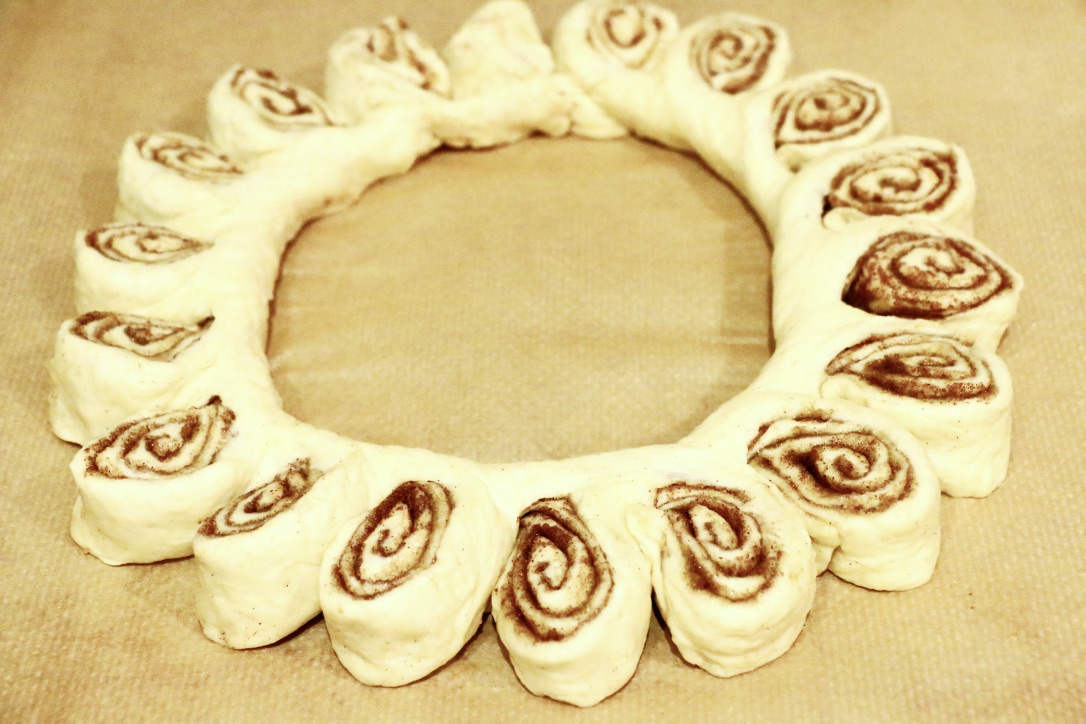
- Leave to rise again until it’s almost doubled in size. When you’re nearly ready to bake, heat the oven to 175C/350F. When the dough has risen sufficiently, bake the wreath for about 25-30 minutes until it’s an even golden-brown. As more surface area is exposed, this shape tends to bake a little quicker than the other shapes, so check it sooner. As with the others, rotate the baking sheet halfway through to promote an even colour, and cover loosely with foil or parchment paper if it looks like it’s browning too quickly. Check for doneness in the usual way: it should feel firm but not hard to the touch and sound almost hollow when tapped. It’s easy with this shape to lift a corner off the parchment carefully to check that the bottom is lightly golden to the centre.
- Remove the sheet to a cooling rack and drizzle or spoon over the glaze while the wreath is still very warm. Serve right away, or at room temperature (or freeze well-wrapped once completely cool and defrost still in the wrapping so condensation stays outside).
More sweet bread recipes on Crumbs on the Table:
More Christmas recipes and stories on Crumbs on the Table:


 Tour D’Argent: a remembrance of things past at today’s prices
 Apricots, les abricots
 I used to cook in a piggery



 Seed cake and story




 Easter is late this year
Leave a Reply